Last updated: September 15, 2025 – refreshed with new tips and links for this school year.
DIY Lunchables (3 Easy Variations for Kids + Adults)
Your childhood favorite, made healthier and cheaper at home. These DIY Lunchables use divided containers to keep everything crisp, fresh, and fun.
If your kids beg for Lunchables at the store—or if you secretly love them, too—you’re in good company.
Buying them weekly adds up fast. Making them at home is cheaper, fresher, and way more customizable.
We pack ours in Rubbermaid EasyFindLids Meal Prep Containers because the dividers keep crackers dry and fruit juicy.
The lids snap to the bases so you’re not hunting in the cabinet at 7 a.m. before school drop-off.
Why Make DIY Lunchables?
DIY Lunchables give you control over ingredients, portions, and budget—without sacrificing fun.
- Healthier: Choose lower-sodium meats, whole-grain crackers, and plenty of produce.
- Cheaper: Bulk packs of cheese, crackers, and fruit stretch across multiple lunches.
- Customizable: Mix-and-match spreads, proteins, and sides for picky or adventurous eaters.
- Fun: Kids love the “build-your-own” style. Adults do, too.
Start simple, then rotate ingredients to keep things exciting all year long.
Back-to-School Made Easier
In August and September, routines ramp up fast. DIY Lunchables remove one big decision from busy mornings.
Prep three to four boxes on Sunday. Stack them in the fridge. Grab-and-go is the vibe for the rest of the week.
They’re not just for kids. I pack the Mediterranean box for myself when I want a lighter lunch that still satisfies.
Below are three family favorites: The Classic, The Mediterranean, and The Taco.
Each one takes under 10 minutes to assemble and can be customized with what’s already in your fridge.
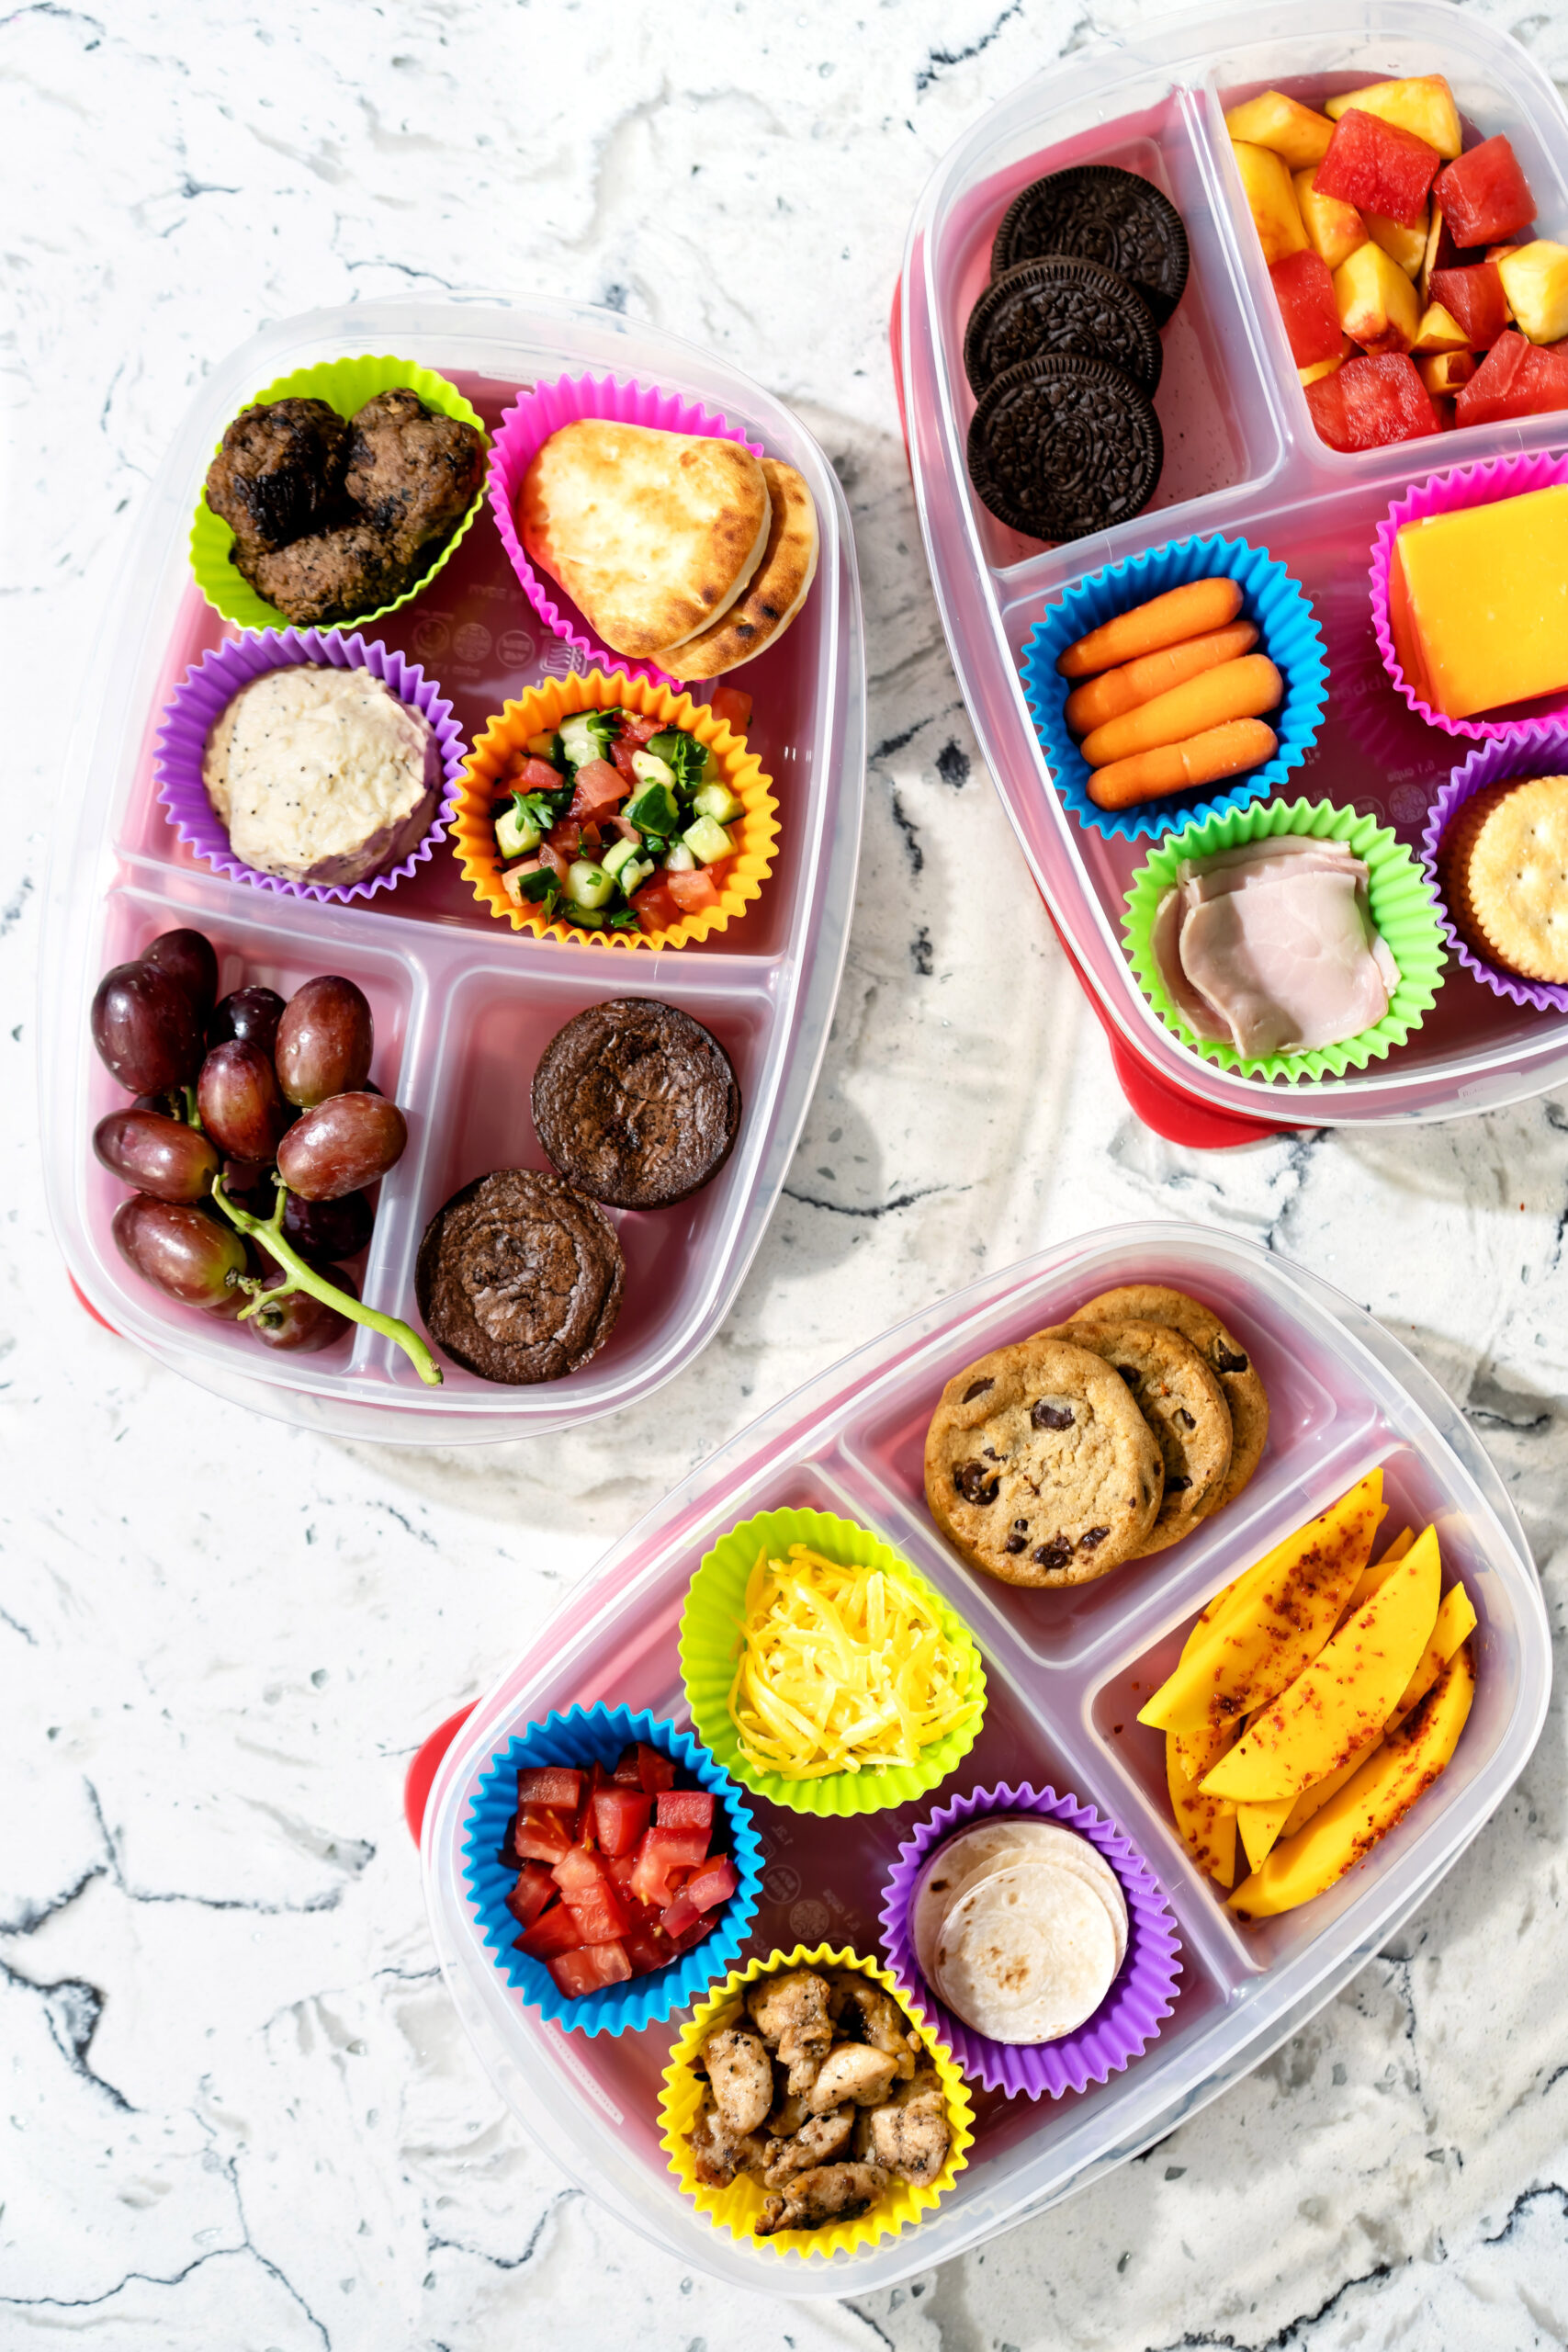
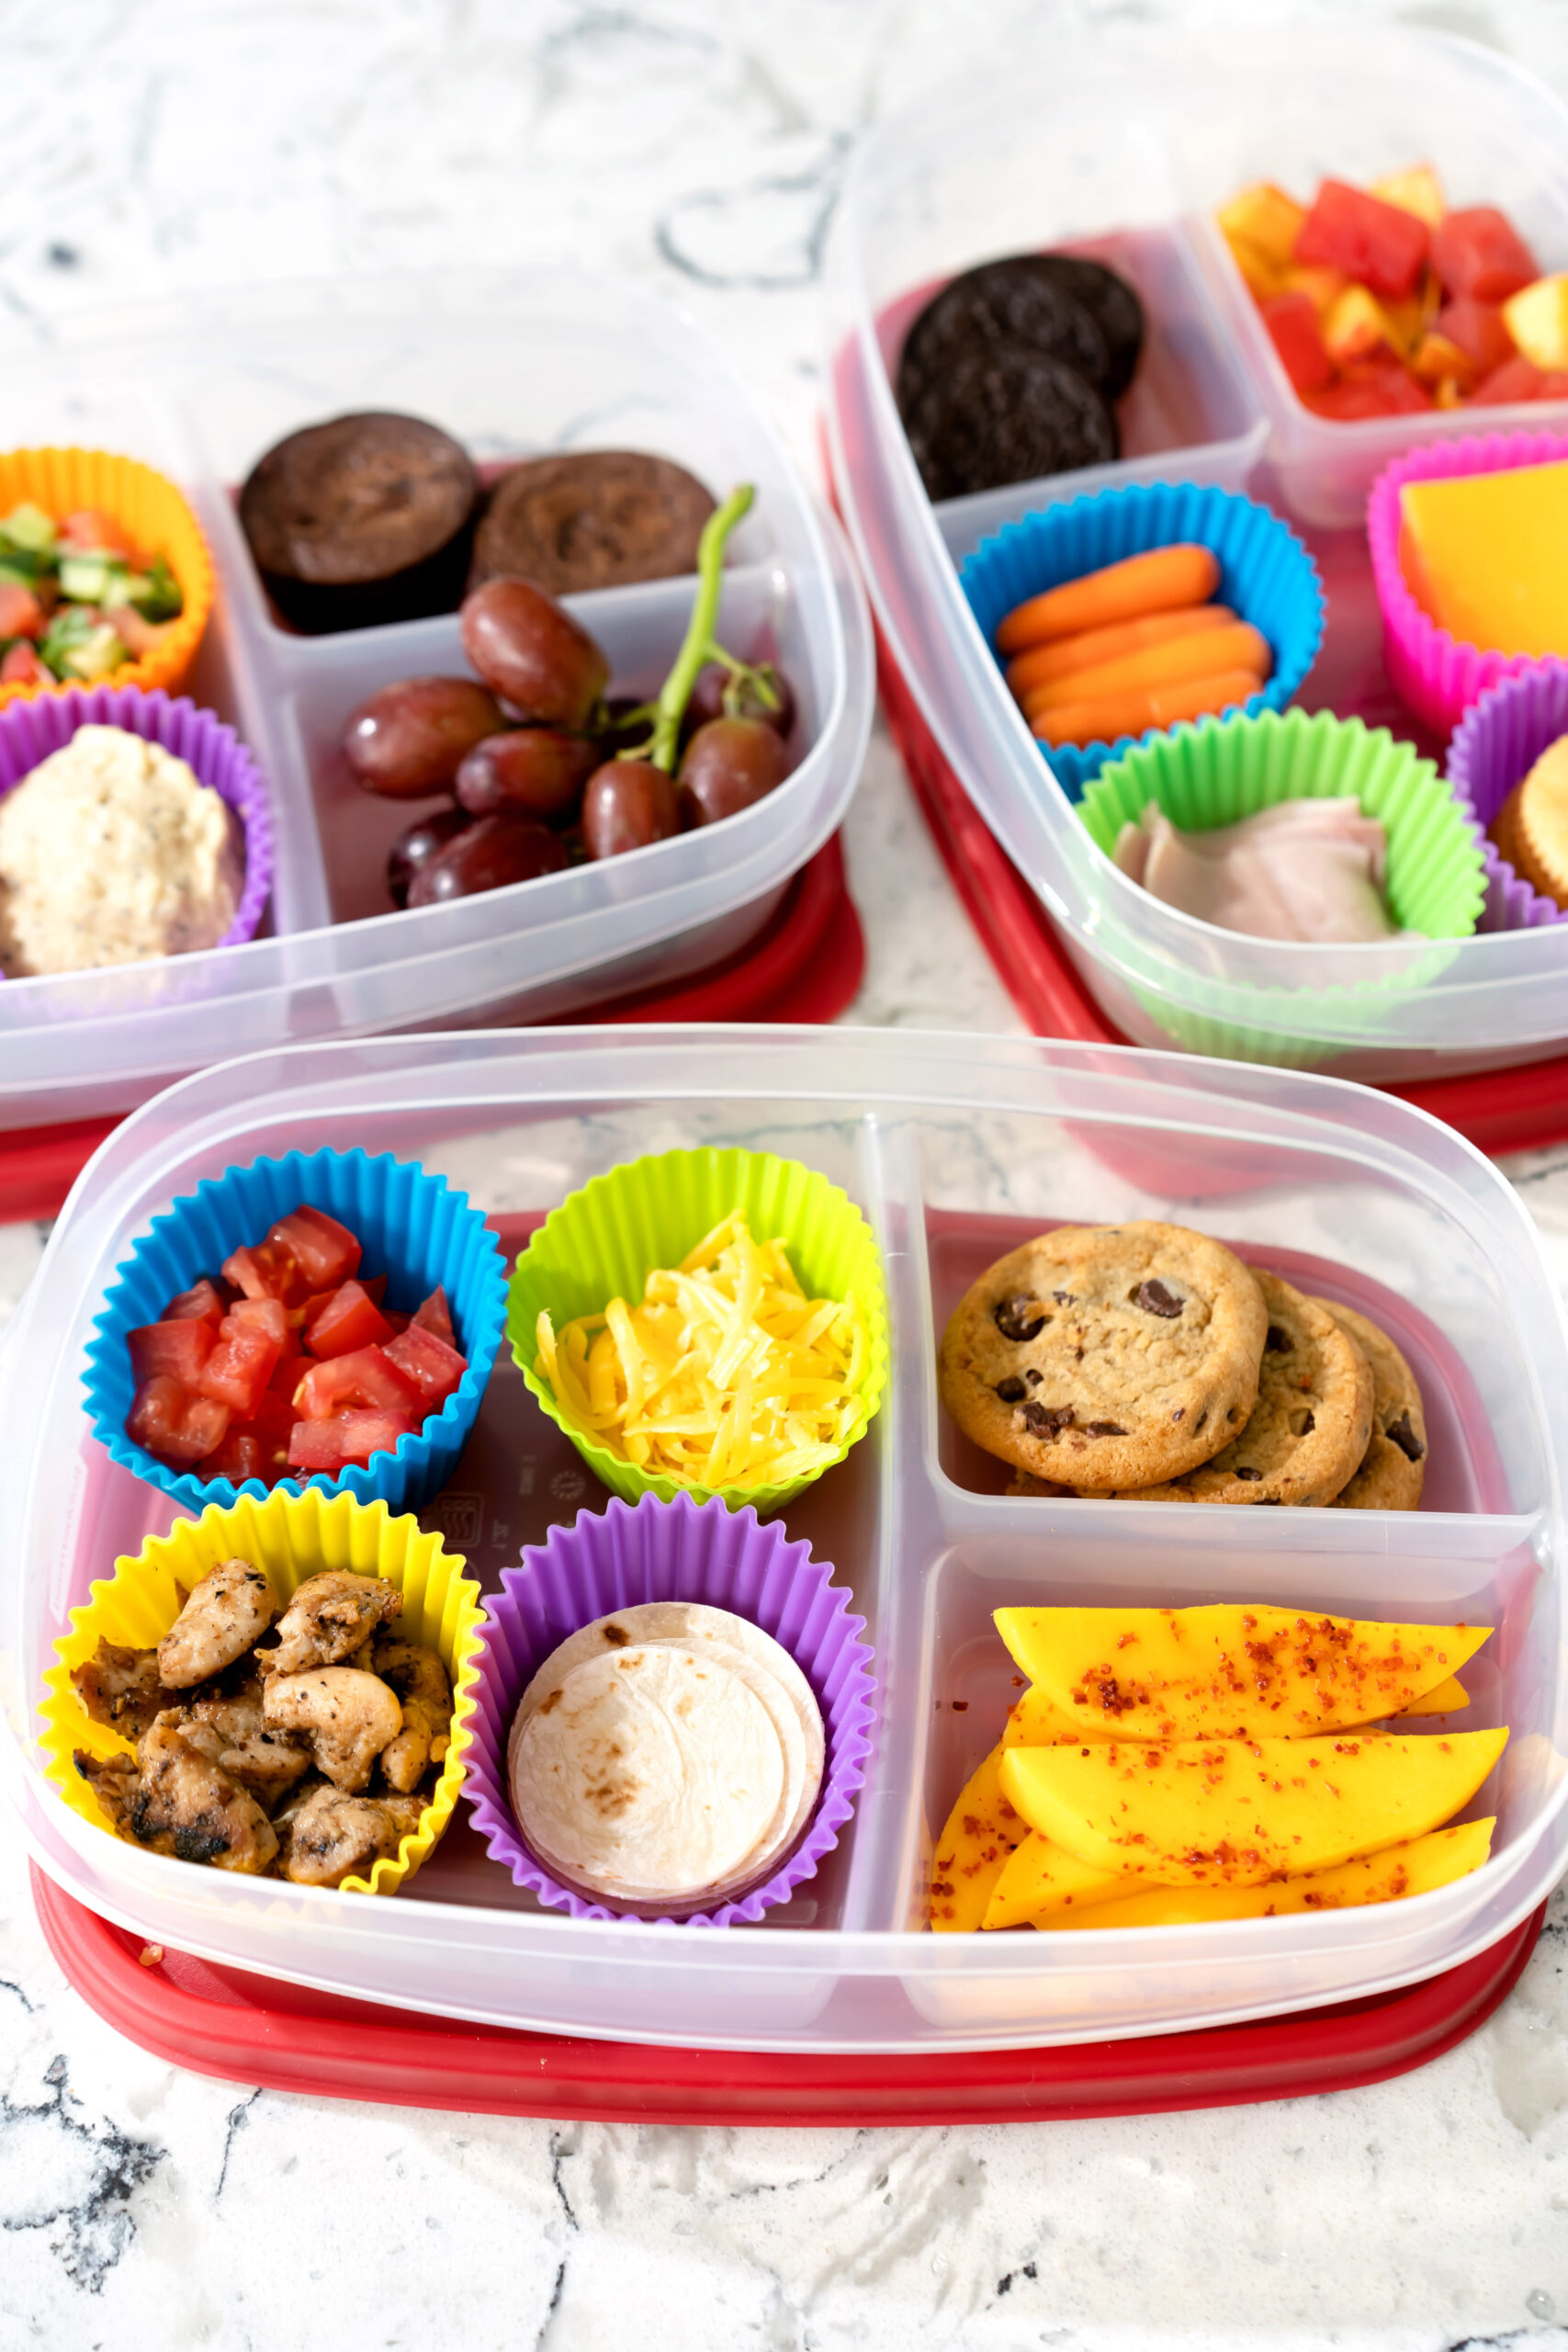
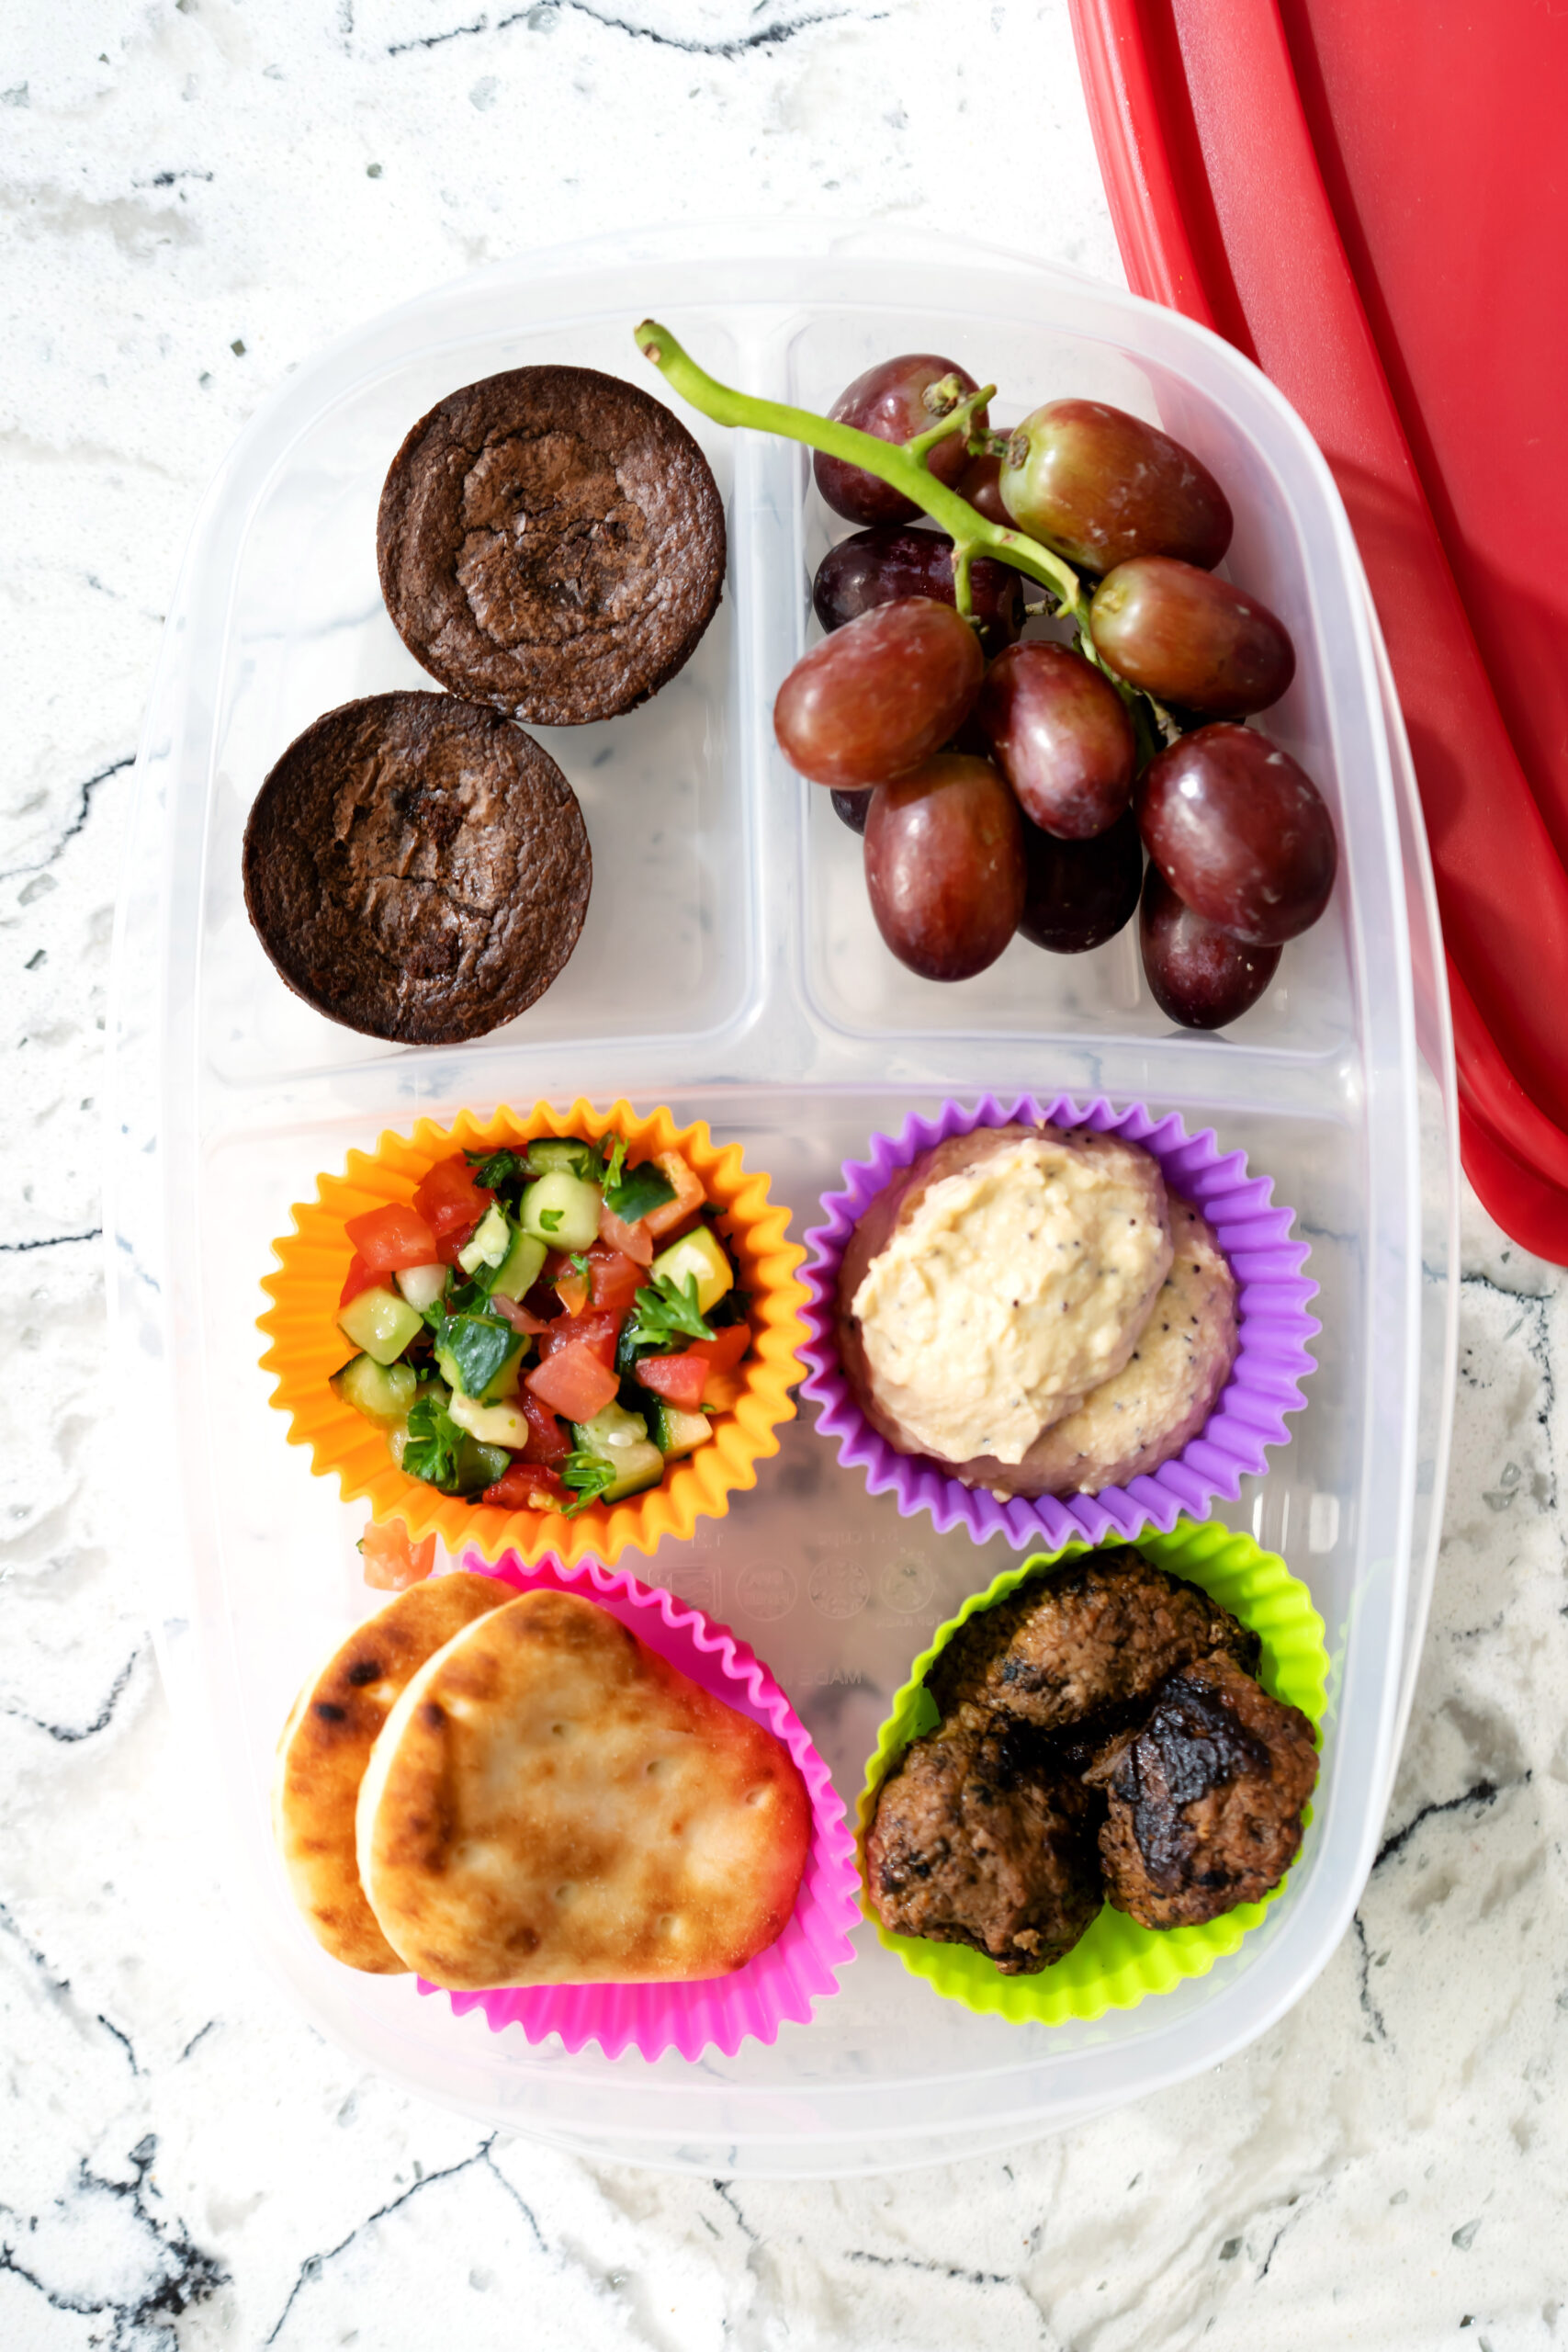
DIY Lunchable: The Classic

This is the nostalgic lunchbox combo we all know and love.
It’s reliable, filling, and easy to scale for more than one kid.
- Sliced turkey or ham
- Cheddar or mozzarella cheese cubes
- Whole-grain crackers
- Fruit: grapes, apple slices, or strawberries
- Small treat: cookie or chocolate square
Tip: Swap crackers for pita chips or pretzels to keep it fresh.
Storage: Keep crackers in a separate compartment or add them in the morning.
DIY Lunchable: The Mediterranean
This box leans fresh and zippy with creamy dips and crisp veggies.
It’s a little fancier without being fussy.
- Pita wedges
- Hummus or tzatziki
- Cucumber slices and cherry tomatoes
- Olives
- Feta cheese cubes
- Optional protein: chicken skewers or baked meatballs
Tip: Pack dips in mini containers to keep pita from getting soggy.
Make it a meal: Add nuts or a yogurt to boost protein.
DIY Lunchable: The Taco
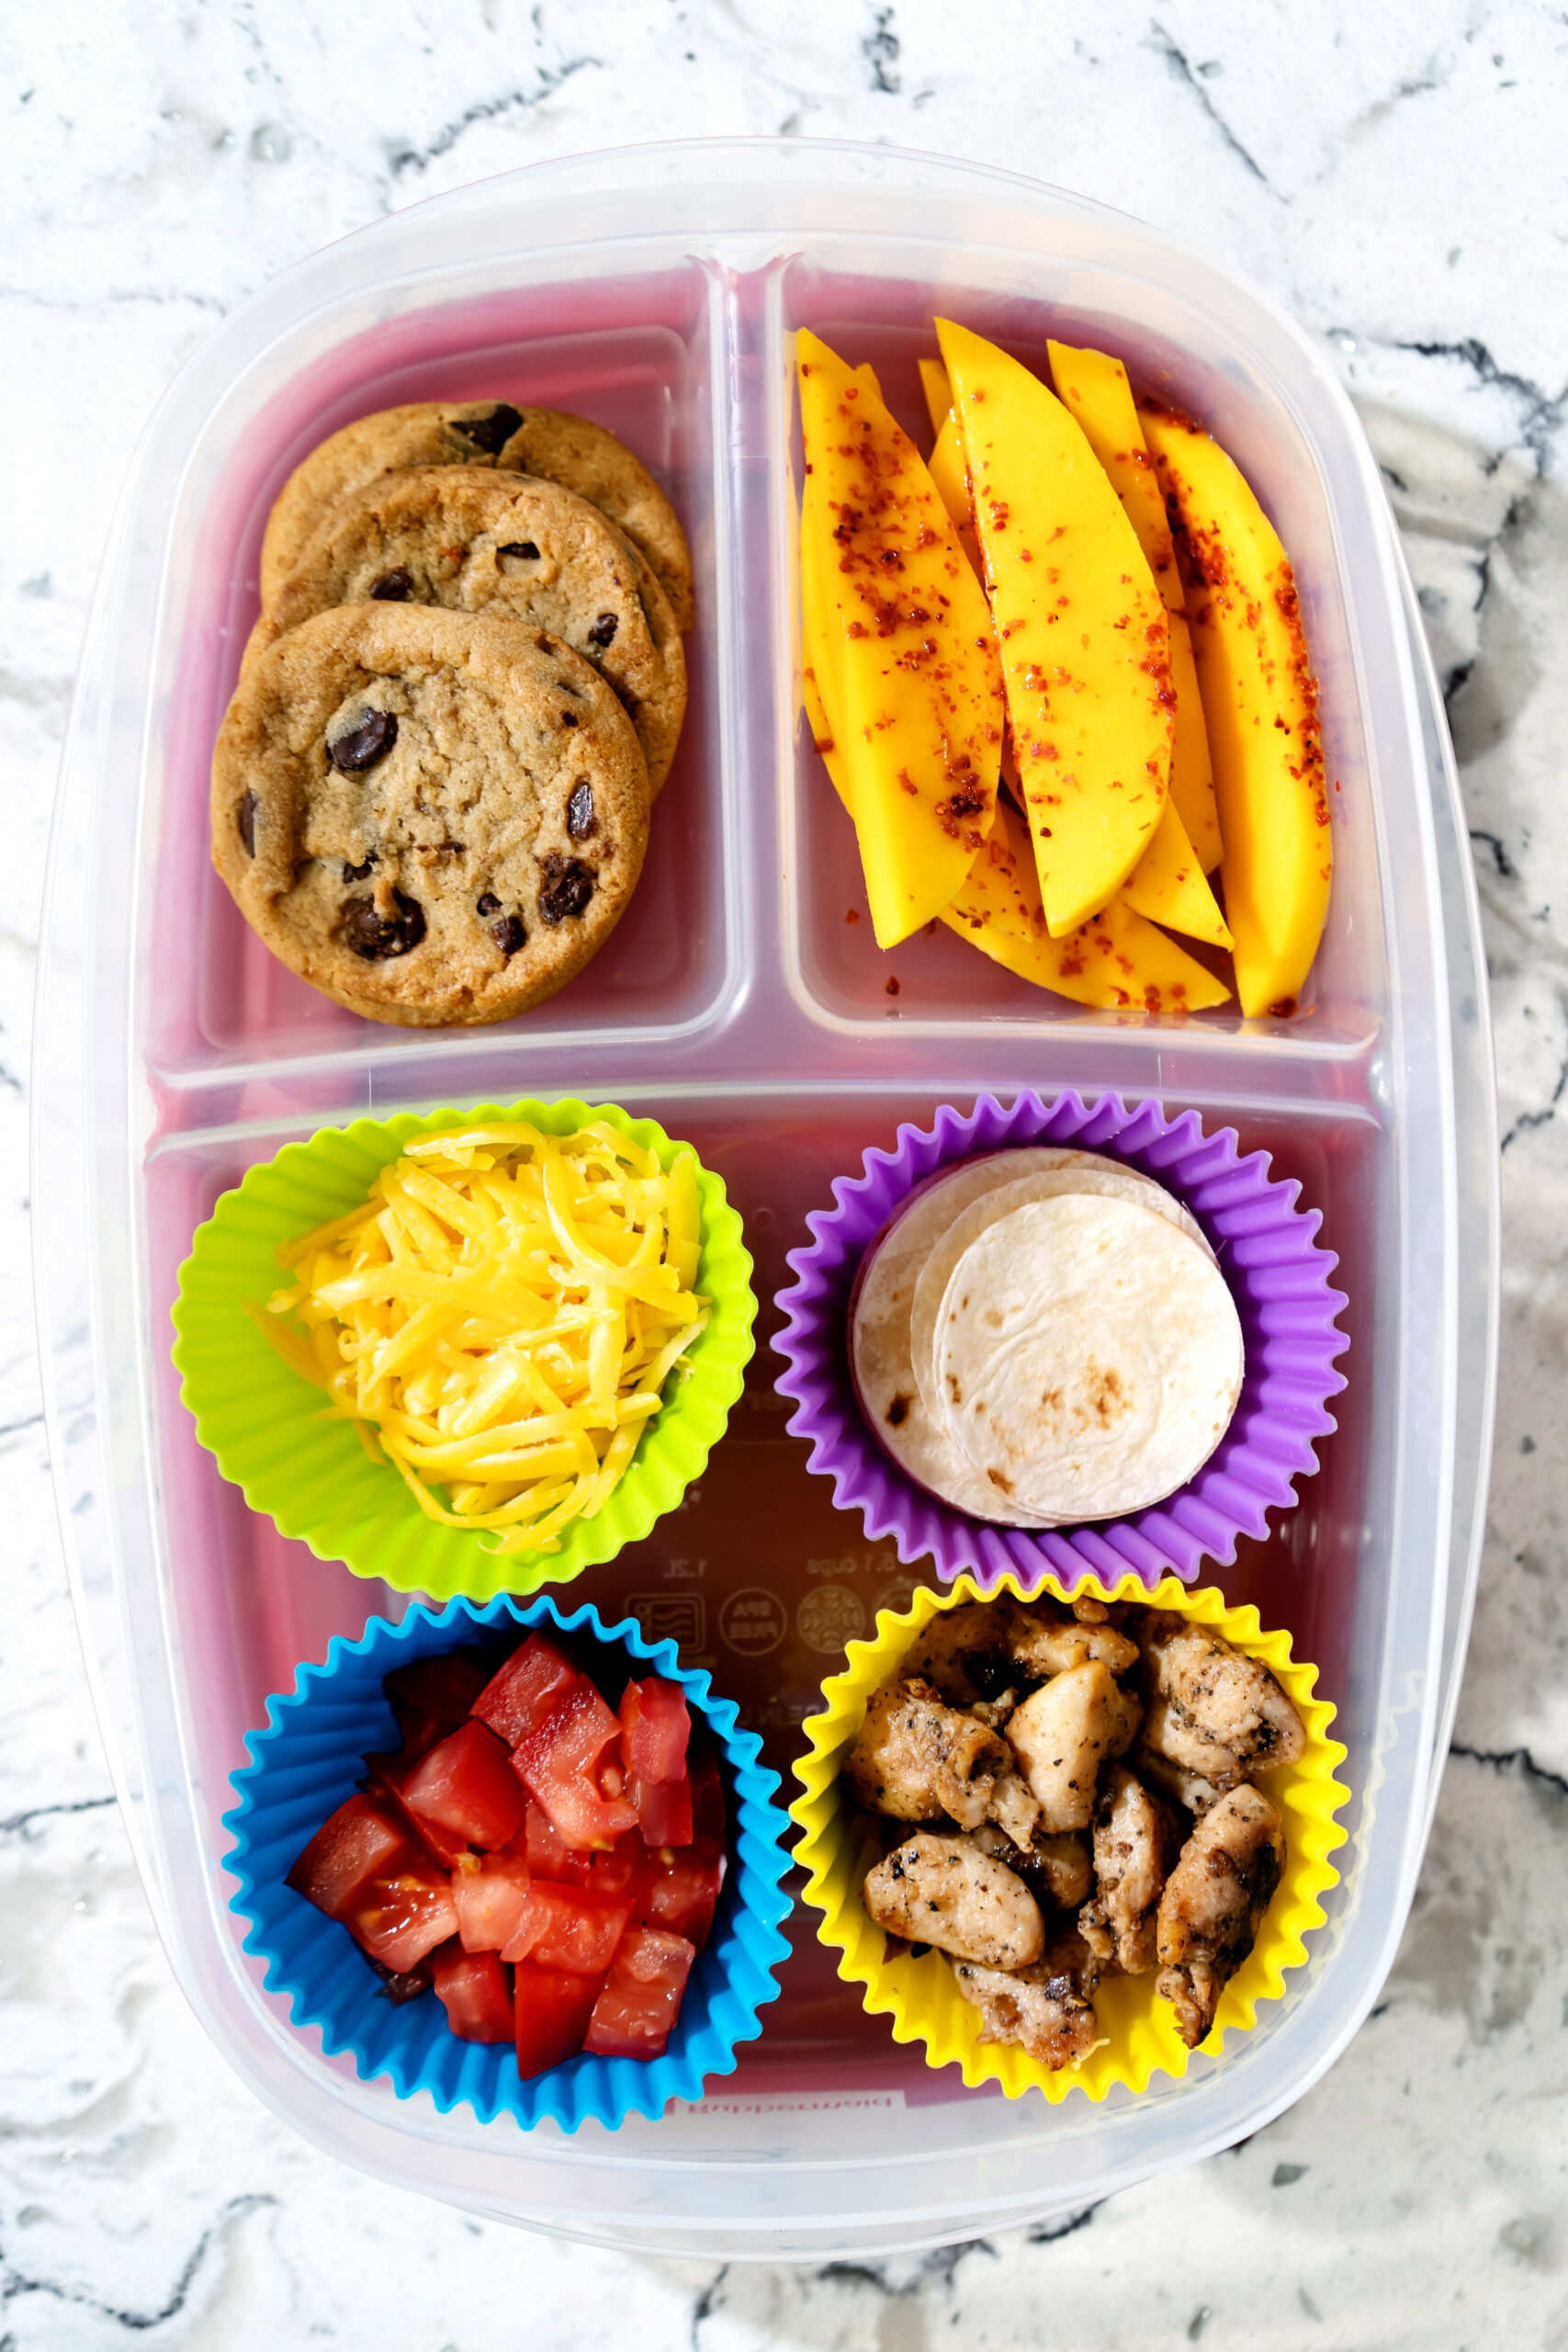
This one feels like taco night at school. Kids love to build it themselves.
It’s flexible, so swap proteins based on leftovers.
- Mini tortillas
- Cooked ground beef or shredded chicken
- Shredded cheese
- Lettuce and diced tomato
- Salsa or guacamole in a leak-proof cup
Tip: Keep tortillas dry and warm the meat before packing if you can.
Shortcut: Use rotisserie chicken for zero cooking on busy nights.
Budget Breakdown: DIY vs Store-Bought
Store-bought Lunchables average $2.50–$3.00 each.
Multiply that by five days a week and nine months of school—it adds up quickly.
Homemade boxes usually land around $1.25–$1.50 per serving, depending on ingredients and sales.
You’ll also get better quality and bigger portions.
Meal Prep & Storage Tips
DIY Lunchables stay fresh for three to four days when packed properly.
Dry produce thoroughly after washing. Moisture is the enemy of crisp crackers and pita.
- Use mini silicone cups to corral dips and small items.
- Add crackers the morning of if humidity is high.
- Keep proteins chilled and pack an ice pack for school.
- Slice fruit the night before to save time at breakfast.
Label each lid with a piece of tape so kids know which box is theirs.
Quick Build Guides
These aren’t strict recipes—think of them as templates you can customize every week.
Rotate a new fruit or cracker each time to keep lunch exciting.
The Classic
Ingredients: turkey slices, cheese cubes, whole-grain crackers, fruit, small treat.
How to pack: Keep crackers separate from fruit. Tuck the treat into the smallest compartment.
The Mediterranean
Ingredients: pita wedges, hummus or tzatziki, cucumber, tomato, olives, feta, optional meatballs or chicken.
How to pack: Place dips in sealed cups. Add veggies next to the dip right before serving if your kid prefers extra crunch.
The Taco
Ingredients: mini tortillas, cooked protein, shredded cheese, lettuce, tomato, salsa/guac.
How to pack: Stack tortillas in their own section. Seal salsa and guac tightly to prevent leaks.
More Recipes You’ll Love
Keep the lunch momentum going with these family-friendly ideas.
- How to Make the Perfect Grilled Cheese
- Mediterranean Greek Salad Wraps
- Copycat Smashburger Chicken Sandwich
Mix and match components to build a week of low-stress lunches.
DIY Lunchables — FAQ
Can I prep these ahead?
Yes. Prep three to four days in advance and keep boxes refrigerated. Add crackers the morning of for maximum crunch.
What containers work best?
Divided containers with tight-fitting lids keep flavors and textures separate. Choose BPA-free, dishwasher-safe options for easy cleanup.
How do I keep bread from getting soggy?
Dry produce after washing. Use silicone cups for dips. Pack bread and crackers away from juicy fruit and veggies.
What proteins besides lunch meat can I use?
Rotisserie chicken, hard-boiled eggs, tuna salad, baked meatballs, or leftover steak slices all work well.
Are these good for adults?
Absolutely. The Mediterranean box is a great desk lunch, and the Taco box doubles as a hearty snack before sports.
About the Author: Matt Robinson is the dad behind Real Food by Dad, a trusted dad food blog sharing fast, family-friendly recipes since 2014.
Leave a comment
Have a comment or question? Let me know, I'd love to hear from you.
2 comments to " DIY Lunchables "